

Showing posts with label hungry caterpillar. Show all posts
Showing posts with label hungry caterpillar. Show all posts
Thursday, September 15, 2011
Cricut Creativity.
Just when you thought I couldn't add anything more to Jack's room for craftiness I decide I have an idea for his door....
 A little vinyl work from my cricut + a cute hungry caterpillar picture of Jack = CUTE! :)


Friday, August 19, 2011
Mod Podge.
So before Jack came along, I was determined to make some fancy letters for above his crib spelling out his name. I wasn't able to find any that matched the whole Hungry Caterpillar theme and so I figured that I needed to make them. I did some research on how to Mod Podge my own letters. For some reason I was a little intimidated about using this stuff and also had limited fabric usage so I knew I couldn't screw up!
Mod Podge is probably the easiest stuff I have ever used though! It is literally like glue. I am sorry to say that I didn't take pictures during this project but I will explain the procedure because it is that easy.
Here is Mod Podge just so you know what you are looking for if you decide to try it out ;)

Here are the letters covered (Project finished but will help you visualize what I am talking about)

I started with big wooden letters and traced the letters onto paper. I then cut around the traced letter lines (Not on the traced line though). I pinned the letter to the fabric and then cut on the line with the paper and fabric. (Cutting on the traced line now helps to cut a cleaner, more accurate line on the fabric rather than trying to cut the same exact letter twice).
Once the fabric letter is cut out, I used a paint brush to smooth on a layer of Mod Podge onto the front of my letter--Just enough to make a layer of "glue". Then I laid the fabric onto the letter as close to the wooden letter as possible. My fabric stretched slightly when smoothing but it was still pretty close to the template that it didn't look bad. Other fabrics may stretch worse though. To finish the letters, I just smoothed a final layer of Mod Podge over them to "seal" them!
Ta-Dah!

Mitch also made a really cute canvas art print for Jack's room of the Hungry Caterpillar. He individually cut up a bunch of paint sample blocks to form the caterpillar but we were having a hard time getting it to seal and lay flat to the canvas. After making these letters, I thought let's give Mod Podge a try. Its really that addictive to use and the coolest stuff ever. I feel like the possibilities are endless.
Here is the art piece that he made-- Notice how well the whole thick art piece sealed to the canvas rather than curling up which it had done with glue and sticky dots.

Mod Podge is probably the easiest stuff I have ever used though! It is literally like glue. I am sorry to say that I didn't take pictures during this project but I will explain the procedure because it is that easy.
Here is Mod Podge just so you know what you are looking for if you decide to try it out ;)
Here are the letters covered (Project finished but will help you visualize what I am talking about)

I started with big wooden letters and traced the letters onto paper. I then cut around the traced letter lines (Not on the traced line though). I pinned the letter to the fabric and then cut on the line with the paper and fabric. (Cutting on the traced line now helps to cut a cleaner, more accurate line on the fabric rather than trying to cut the same exact letter twice).
Once the fabric letter is cut out, I used a paint brush to smooth on a layer of Mod Podge onto the front of my letter--Just enough to make a layer of "glue". Then I laid the fabric onto the letter as close to the wooden letter as possible. My fabric stretched slightly when smoothing but it was still pretty close to the template that it didn't look bad. Other fabrics may stretch worse though. To finish the letters, I just smoothed a final layer of Mod Podge over them to "seal" them!
Ta-Dah!

Mitch also made a really cute canvas art print for Jack's room of the Hungry Caterpillar. He individually cut up a bunch of paint sample blocks to form the caterpillar but we were having a hard time getting it to seal and lay flat to the canvas. After making these letters, I thought let's give Mod Podge a try. Its really that addictive to use and the coolest stuff ever. I feel like the possibilities are endless.
Here is the art piece that he made-- Notice how well the whole thick art piece sealed to the canvas rather than curling up which it had done with glue and sticky dots.

Wednesday, May 11, 2011
Baby Book.
Tonight I started the intimidating mission of filling in Mini Bee's baby book. Although I am usually told that I have very nice handwriting, I still get intimidated to write nice in a book that my child will keep forever.
Here is a picture of the baby book that we bought to fill out:

Here is a picture of the baby book that we bought to fill out:
Filling out the information together is a good chance to talk about when we first found out all the way up to the upcoming arrival. By filling out the book, it made me so excited to see all this special information in one place.
While I was filling out the baby book, Mitch worked on his special nursery project. He made the hungry caterpillar out of paint chips. It isn't quite finished yet so we will take pictures when it is all done. The art in the nursery is pretty much all we have left for getting the nursery finished. Once the art is up, pictures will be taken :)
Wednesday, May 4, 2011
Baby Shower (1).
I have no idea how this week has gotten past me but the fact that Easter weekend was a long time ago makes this post more urgent.
My wonderful sister, sister-in-law and mother put together lots of work and effort to throw me a very special baby shower.

The shower consisted of my relatives and close family friends. Not only was I "showered" with lots of amazing gifts but it was also a good chance to see lots of cousins I haven't had a chance to see.
Here is the brunch menu served:
(Eggbake, fruit, and muffins)

First on the game agenda was to have all the guests decorate onesies with any design or quote they could come up with and I chose my favorite from all of the designs.
Here is a sample: (including my favorite choice--the middle shirt, I am sure to hold true)

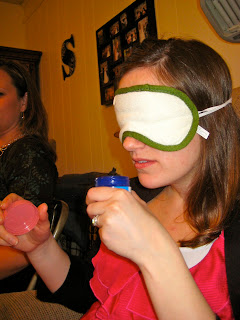
Then we played a game where I was blindfolded and had to feel all the different baby supplies and guess what they were. I was awesome at this game by the way ;)

Last up, we played what might have been my favorite game. There was 20 qualities listed and I had to choose whose quality I want Mini Bee to have. (Ex: Eyes: Mine or Mitch's?) I then compared my answers with everybody else's. It was interesting to see which qualities people thought were more desirable in Mitch and I.
Another awesome piece to the shower....
A diaper cake my mom made for me :)

At the shower I received lots of thoughtful/useful/cute gifts. This little mini bee is sure spoiled and lucky. I think he feels pretty loved.
Here is his closet after the first shower...

How awesome, right? Mitch and I (and of course Mini Bee too) feel very fortunate to have so many people celebrating with us in the upcoming arrival of our little guy.
Thank You!! :)
My wonderful sister, sister-in-law and mother put together lots of work and effort to throw me a very special baby shower.

The shower consisted of my relatives and close family friends. Not only was I "showered" with lots of amazing gifts but it was also a good chance to see lots of cousins I haven't had a chance to see.
Here is the brunch menu served:
(Eggbake, fruit, and muffins)

First on the game agenda was to have all the guests decorate onesies with any design or quote they could come up with and I chose my favorite from all of the designs.
Here is a sample: (including my favorite choice--the middle shirt, I am sure to hold true)

Then we played a game where I was blindfolded and had to feel all the different baby supplies and guess what they were. I was awesome at this game by the way ;)


Last up, we played what might have been my favorite game. There was 20 qualities listed and I had to choose whose quality I want Mini Bee to have. (Ex: Eyes: Mine or Mitch's?) I then compared my answers with everybody else's. It was interesting to see which qualities people thought were more desirable in Mitch and I.
Another awesome piece to the shower....
A diaper cake my mom made for me :)

At the shower I received lots of thoughtful/useful/cute gifts. This little mini bee is sure spoiled and lucky. I think he feels pretty loved.
Here is his closet after the first shower...

How awesome, right? Mitch and I (and of course Mini Bee too) feel very fortunate to have so many people celebrating with us in the upcoming arrival of our little guy.
Thank You!! :)
Wednesday, April 20, 2011
Mini Bee's Closet.
So besides the closet dividers, I also decided to go all out and make little cubby/ drawer labels to remind me what goes where.
Here are the labels:
(They have the hungry caterpillar on them - Found the image online and laminated the label. Then added a label made from a label maker)

Here is a view of the whole closet with the clothes and other few items we have purchased or received.

Maybe it doesn't look like much but I am pretty proud of what we have worked on. The closet previously had one of those white racks across the top and that was it. This will provide us with more storage and organization- my favorite :)
Here are the labels:
(They have the hungry caterpillar on them - Found the image online and laminated the label. Then added a label made from a label maker)

Here is a view of the whole closet with the clothes and other few items we have purchased or received.

Maybe it doesn't look like much but I am pretty proud of what we have worked on. The closet previously had one of those white racks across the top and that was it. This will provide us with more storage and organization- my favorite :)

Tuesday, April 19, 2011
Baby Closet Dividers.
I finally finished those projects I have been mentioning. I think I am in semi-nesting mode because I have been so productive even after a full day of work lately. Here is one of the products of my nesting!
Closet Size Dividers
Here is the inspiration/ template for my creation.
 Taken from: http://www.lifehack.org/articles/lifehack/make-your-own-closet-rod-dividers.html
Supplies I Used:
Scissors
Ruler
Foam Sheets
Lid to a Vitamin Bottle
Glue Gun
Packing Tape (if doing the same design)

Step 1: Cut the foam to fit the original door hanger template.
 Step 2: Find a lid to fit in the template circle and twist it leaving an imprint on the foam so that you know where to cut the circle at. (I used two sheets of foam/hanger to make it a little sturdier)
 Step 3: Here are all of the dividers cut: 2 sheets/ color,
 Step 4: I found some clip art on the computer and cut it out to fit my divider. Then covered it with packaging tape to help protect it from bleeding or tearing. I also found some paper numbers to glue on for sizes. The color strip and numbers were hot glued on.
Final Product:
 In Use:

Tomorrow I will show the other personalization I have done to the closet and show off the whole organizer that we setup a few weeks ago. Check back for updates :)
Closet Size Dividers
Here is the inspiration/ template for my creation.

Supplies I Used:
Scissors
Ruler
Foam Sheets
Lid to a Vitamin Bottle
Glue Gun
Packing Tape (if doing the same design)

Step 1: Cut the foam to fit the original door hanger template.


Final Product:


Tomorrow I will show the other personalization I have done to the closet and show off the whole organizer that we setup a few weeks ago. Check back for updates :)
Sunday, March 20, 2011
Whew!
What a weekend! This girl was lucky enough to have her mom visit this weekend. We were sewing up a storm -- whipping our spare "dropping grounds" bedroom into a baby nursery.

First big move: My parents bought us a crib and dresser. Very beautiful and I love it! Thanks Mom and Dad. We are pretty lucky to have parents who help us out :)
Then, the spare furniture was moved out of the room to clear it for crib building. I of course, supervised since I shouldn't lift anything which was hard.
Mitch surprised us with building the crib while my mom and I were out picking up a few fabric things. Yay! Good job daddy :)
My mom and I went to work and made a bunch of cute burp cloths, a blanket, and all the crib bedding (minus the quilt). It turned out super cute and even better that its all personalized since we designed it. Made with lots of love! Pretty lucky to have a talented mom :)


Our Nursery Theme: The Very Hungry Caterpillar (a childrens book by Eric Carle)
Here are the fabrics that we used:


Sorry for the picture tease but I want to do a big nursery reveal when its all complete. A few more pieces will need to be made and we need to hunt for some different fabric pieces.
P.S. Reality is slowly settling in more as we walk out of our bedroom and see a (very cute) baby crib! Crazy to think a baby will be in there a few months ahead. And what? March is almost at the end already? Nuts!
Our little boy is already pretty lucky to be surrounded by so many people who love him. He already is so anticipated and is it fun to slowly have things being bought/made for him!
We appreciate it all :)
Thanks mom for doing so much work this weekend! I love it all and it is so special! Mini Bee will love it :)

First big move: My parents bought us a crib and dresser. Very beautiful and I love it! Thanks Mom and Dad. We are pretty lucky to have parents who help us out :)
Then, the spare furniture was moved out of the room to clear it for crib building. I of course, supervised since I shouldn't lift anything which was hard.
Mitch surprised us with building the crib while my mom and I were out picking up a few fabric things. Yay! Good job daddy :)
My mom and I went to work and made a bunch of cute burp cloths, a blanket, and all the crib bedding (minus the quilt). It turned out super cute and even better that its all personalized since we designed it. Made with lots of love! Pretty lucky to have a talented mom :)
Flannel Blanket:

Burp Cloths:

Our Nursery Theme: The Very Hungry Caterpillar (a childrens book by Eric Carle)
Here are the fabrics that we used:


Sorry for the picture tease but I want to do a big nursery reveal when its all complete. A few more pieces will need to be made and we need to hunt for some different fabric pieces.
P.S. Reality is slowly settling in more as we walk out of our bedroom and see a (very cute) baby crib! Crazy to think a baby will be in there a few months ahead. And what? March is almost at the end already? Nuts!
Our little boy is already pretty lucky to be surrounded by so many people who love him. He already is so anticipated and is it fun to slowly have things being bought/made for him!
We appreciate it all :)
Thanks mom for doing so much work this weekend! I love it all and it is so special! Mini Bee will love it :)
Subscribe to:
Posts (Atom)